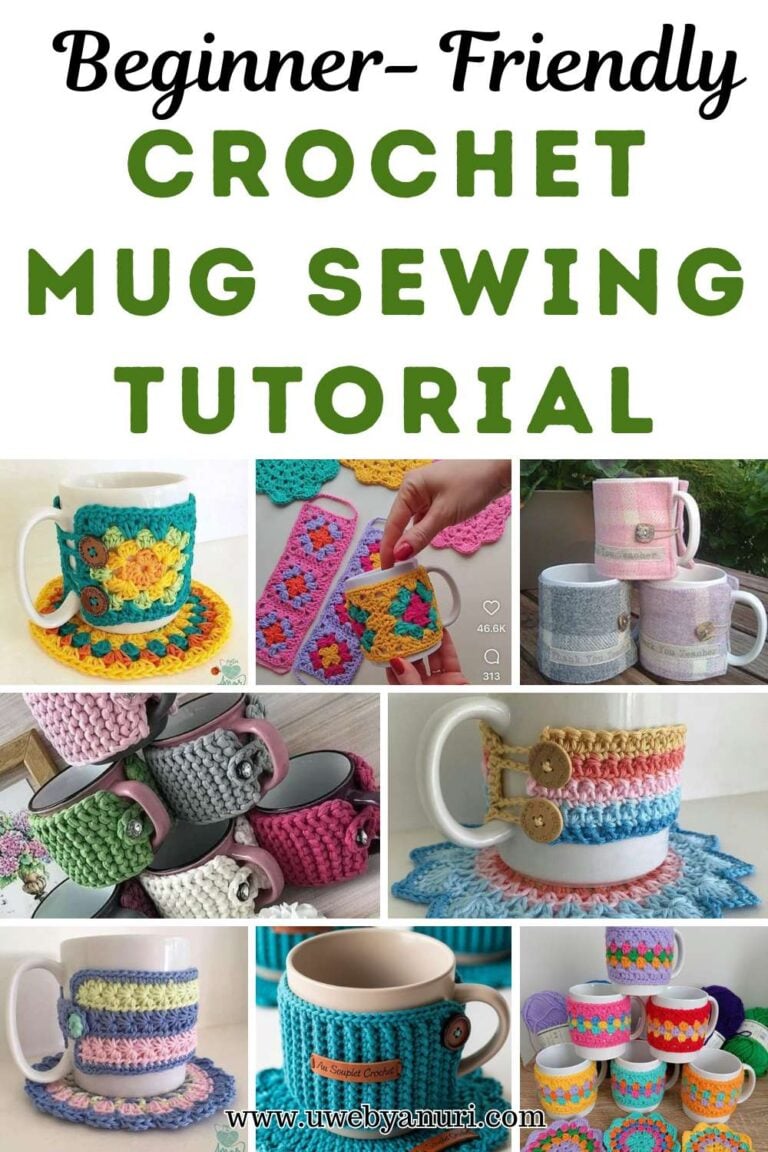
How to Sew a Reversible Bucket Hat: Easy Step-by-Step DIY Tutorial for Beginners
The first time I tried making a bucket hat, I honestly thought it would be one of the hardest sewing projects I could attempt. A hat seemed complicated because it has curves, different pieces, and needs to fit properly on the head. I always wondered how a few pieces of fabric could come together to create something so stylish and useful. Every time I bought a bucket hat, I found myself turning it inside out, looking closely at the seams, and trying to understand how everything was connected.
After a while, I decided to stop wondering and start sewing. That decision led me to one of my favorite beginner-friendly sewing projects. Making a reversible bucket hat is not only fun, but it also gives you two different looks in one hat. You can wear one side today and flip it over tomorrow for a completely different style. check out this projects: Reversible Bucket Hat Tutorial
A reversible bucket hat is practical for sunny days, beach trips, vacations, outdoor walks, and everyday wear. It protects your face from the sun while adding a stylish touch to your outfit. The best part is that you can choose fabrics that match your personality and create something completely unique.
In this step-by-step tutorial, you will learn how to draft your own bucket hat pattern, cut your fabric, sew the different sections together, and finish a professional-looking reversible bucket hat. Even if you are new to sewing, you can successfully complete this project by following each step carefully.
Why You Will Love This Reversible Bucket Hat Project
A reversible bucket hat is one of the best beginner sewing projects because it teaches several important sewing skills while still being easy to complete. You will learn how to create a pattern, cut fabric accurately, attach interfacing, sew curved seams, and construct a fully lined project. These are valuable techniques that can help you with many future sewing projects. you may love to see this: Simple Things to Sew for Your Kitchen
Another reason people love this project is the versatility. Instead of making one hat, you are actually making two hats in one. One side can feature a bold print while the other side can have a simple neutral color. This allows you to match different outfits without needing multiple hats. It also makes the project feel more rewarding because you get extra value from the time and effort you invest.
The finished hat looks professional, stylish, and durable. It can also make a wonderful handmade gift for friends and family members who appreciate practical handmade items.
Materials Needed to Sew a Reversible Bucket Hat
Before starting your project, gather all your sewing supplies and prepare your workspace. Having everything ready before you begin makes the process smoother and more enjoyable.
You will need two different fabrics for the reversible design. Cotton, linen, canvas, and lightweight denim all work very well for bucket hats because they provide structure without becoming too heavy. Choosing two contrasting fabrics allows both sides of the hat to stand out beautifully.
You will also need fusible interfacing to strengthen the brim. This extra layer helps the hat maintain its shape and prevents the brim from becoming floppy after repeated use. Along with fabric and interfacing, prepare your sewing machine, matching thread, measuring tape, scissors, pattern paper, pins, fabric marker, and pressing iron. These basic tools are enough to complete the entire project successfully.
Drafting the Crown Pattern
The crown forms the top section of the bucket hat and serves as the foundation for the entire project. Taking time to create an accurate pattern will help your finished hat fit comfortably and look balanced.
Begin by drawing a square measuring seven inches by seven inches on pattern paper. This measurement includes seam allowances that will be needed later during construction. Fold the square in half vertically and horizontally to find the center point. Using the center as a guide, create a circular shape that will become the top of the hat.
Once the circle is complete, carefully cut it out and measure the circumference around the edge. Write this number down because it will determine the measurements needed for the side band. This pattern piece may seem simple, but it plays a very important role in ensuring that the hat fits properly and maintains its shape once assembled.
Step 2. Creating the Side Band Pattern
The side band connects the crown to the brim and creates the depth of the hat. This section wraps around the head, making it important to achieve the correct size and shape.
Using the circumference measurement from the crown, draw a rectangle on fresh pattern paper. The width should match half of the circumference while the height should measure three and a half inches. After drawing the rectangle, divide it into four equal sections using vertical lines.
Carefully cut along these lines without cutting completely through the paper. This technique is known as slash and spread. Spread each section apart slightly and tape the pattern onto another sheet of paper. This process creates a gentle flare that allows the side band to sit comfortably around the head instead of fitting too tightly. After adding seam allowances, your side band pattern is ready for cutting.
Step 3. Drafting the Bucket Hat Brim
The brim gives the bucket hat its classic appearance and provides shade for the face. A well-shaped brim helps transform a simple fabric hat into a stylish accessory.
Measure the lower edge of your completed side band pattern. This measurement determines the inner opening of the brim. Fold a new piece of pattern paper and use the measurement to create a curved inner edge. Then extend the pattern outward by approximately nine inches to create the desired brim width.
The wider the brim, the more sun protection the hat will provide. After drawing the outer curve, cut out the pattern and unfold it to reveal the complete brim shape. This piece may appear large at first, but once attached to the side band, it creates the familiar bucket hat silhouette that makes this style so popular.
Step 4. Cutting the Fabric Pieces
Now the project begins to feel real because you will start transforming paper patterns into fabric pieces. Place each pattern piece onto both fabrics and carefully trace around the edges.
Cut one crown piece from each fabric, two side band pieces from each fabric, and two brim pieces from each fabric. Accuracy is important during this stage because uneven cuts can affect the final fit of the hat.
You will also cut interfacing pieces for the brim. These pieces should match the brim pattern but can be trimmed slightly smaller to reduce bulk in the seams. After cutting everything, organize the pieces into separate groups so assembly becomes easier later. Taking your time during cutting helps ensure professional-looking results throughout the project.
Step 5. Applying the Interfacing
Interfacing provides structure and stability to the brim. Without it, the brim may collapse or lose its shape after wearing and washing.
Place the interfacing on the wrong side of the brim fabric and follow the manufacturer’s instructions for fusing. Usually, this involves using a hot iron and applying firm pressure for several seconds. Work slowly across the entire surface to ensure the interfacing bonds properly to the fabric.
Once attached, the brim pieces will feel stronger and more durable. This simple step makes a huge difference in the appearance of the finished hat. The added structure helps the brim stand out nicely and gives the project a polished, professional finish.
Step 6. Sewing the Side Band Pieces Together
Now it is time to start turning your fabric pieces into an actual hat. Begin by taking the two side band pieces from your main fabric. Place them on top of each other with the right sides facing together. Carefully match the short edges and pin them in place. Sew along both side edges using a half-inch seam allowance. Once you finish sewing, open the piece and you will notice that it forms a large fabric loop.
This loop will wrap around the head and create the body of the bucket hat. After sewing, press the seams open with an iron. Pressing may seem like a small step, but it helps the hat look neat and professional. Flat seams are easier to work with during the next stages of construction. Repeat the same process with the lining fabric. By the end of this step, you should have two separate loops, one for the outer hat and one for the reversible inner side. These loops are the foundation that will connect the crown and brim together.
Step 7. Attaching the Crown to the Side Band
The crown is the round top piece that closes the hat and gives it shape. Take the side band loop you created in the previous step and place it with the right side facing up. Find the center points of both the crown and the side band. Marking these points can make the sewing process much easier because it helps distribute the fabric evenly.
Pin the crown to the upper edge of the side band with right sides facing together. Since you are attaching a circle to a curved edge, work slowly and pin frequently. This helps prevent puckers and uneven stitching. Once everything is pinned, sew around the entire circle using a half-inch seam allowance. Take your time and guide the fabric gently through the machine.
After sewing, press the seam allowance downward toward the side band. You will immediately begin to see the shape of the hat forming. Repeat the same process with the lining fabric. At this stage, you should have two hat tops that already resemble a bucket hat without the brim attached.
Step 8. Sewing and Attaching the Brim
The brim is what gives a bucket hat its classic look and practical sun protection. Start by taking the brim pieces from your main fabric. Place the matching pieces together with right sides facing and sew the short ends to form a complete circle. Press the seams flat after sewing.
Next, align the inner edge of the brim with the bottom edge of the side band. Pin carefully around the entire circumference. Because both pieces are curved, it is important to pin slowly and evenly. This helps the brim sit smoothly without bunching or twisting.
Sew around the pinned edge using a half-inch seam allowance. Once finished, press the seam allowance upward toward the side band. The hat should now have its full shape, including the crown, side band, and brim.
Repeat exactly the same process for the lining fabric. By the end of this step, you will have two complete bucket hats. One will become the outside of the hat, while the other will become the reversible lining. Seeing both pieces completed is often one of the most exciting moments in the project.
Step 9. Joining the Outer Hat and Lining
This step transforms two separate hats into one reversible bucket hat. Place the outer hat and lining hat together with the right sides facing each other. Carefully match the seams and edges around the brim. Use plenty of pins to keep everything aligned.
Sew around the outer edge of the brim using a half-inch seam allowance. Leave a small opening of about four inches somewhere along the brim. This opening is very important because it will allow you to turn the hat right side out later.
After sewing, trim any bulky seam allowances and clip small notches around curved areas if needed. This helps the hat sit smoothly once it is turned. Reach through the opening and carefully pull the entire hat through until the right sides are facing outward.
Take your time during this stage. Slowly work the fabric through the opening and gently push out the edges with your fingers. Once the hat is fully turned, you will finally see both fabrics and understand how the reversible design works. The transformation at this stage feels almost magical because the project suddenly looks finished.
Step 10. Finishing the Reversible Bucket Hat
The final step focuses on giving your bucket hat a polished and professional appearance. Start by folding the raw edges of the opening inward. Press the opening flat with an iron so the edges blend seamlessly with the rest of the brim. Sew a neat topstitch around the entire outer edge of the brim. This stitching closes the opening and secures all layers together.
Many bucket hats feature multiple rows of decorative stitching around the brim. These extra rows not only look attractive but also help the brim maintain its shape. Sew several rows around the brim, spacing them evenly apart. Work slowly to keep the stitching straight and consistent.
Once the stitching is complete, give the entire hat a final press with your iron. Smooth out any wrinkles and shape the brim evenly. The pressing process helps the hat look crisp and professional. At this point, your reversible bucket hat is completely finished and ready to wear. You can flip it inside out whenever you want a different look, giving you two stylish hats in one project.
Tips for Sewing the Perfect Reversible Bucket Hat
A few simple tips can make your bucket hat look even better. Choosing medium-weight fabrics helps the hat hold its shape without becoming too stiff. Cotton, linen, denim, and canvas are excellent choices because they are durable and easy to sew.
Always take time to press your seams after every step. Many beginners skip pressing, but it is one of the secrets behind professional-looking sewing projects. Pressing helps fabric lie flat and makes the final construction much easier.
Accurate cutting is also important. Even small differences in measurements can affect how the pieces fit together. Double-check your pattern pieces and measurements before cutting into your fabric. A little extra care during preparation often leads to much better results.
Creative Fabric Ideas for Your Bucket Hat
One of the best things about making your own bucket hat is the ability to customize it. Floral prints create a cheerful and feminine look that works well during spring and summer. Denim gives the hat a casual style that pairs nicely with everyday outfits.
Bold Ankara prints create vibrant and eye-catching hats that stand out beautifully. Linen fabrics provide a classic and timeless appearance that feels light and comfortable in warm weather. You can even combine a bright patterned fabric on one side with a solid neutral fabric on the other. This allows you to switch between a bold look and a simple look whenever you want.
Experimenting with different fabric combinations makes each hat unique. Once you complete your first bucket hat, you may find yourself creating several more for different seasons and occasions.
Conclusion
Learning how to sew a reversible bucket hat is a rewarding project that combines creativity, practical sewing skills, and wearable fashion. It is a beginner-friendly project that allows you to create something useful while learning valuable sewing techniques. From drafting your own pattern to sewing the final rows of topstitching, every step helps build confidence and improve your skills.
The finished hat is stylish, comfortable, and versatile. Because it is reversible, you get two different looks from one project. Whether you wear it for a beach day, vacation, picnic, shopping trip, or casual outing, your handmade bucket hat will become a favorite accessory.
The best part is knowing that you made it yourself. Every stitch tells a story of creativity, patience, and accomplishment. Once you finish your first reversible bucket hat, you will likely want to make another one using different colors, prints, and fabric combinations. Happy sewing!