Drawstring Gift Bag Tutorial
If there is one thing I have learned over the years of sewing and handmade gifting, it is that presentation matters just as much as the gift itself. That is exactly why this Drawstring Gift Bag Tutorial has become one of my favorite sewing projects to return to whenever I want something simple, practical, and beautifully personal. A handmade bag instantly transforms even the smallest gift into something meaningful, thoughtful, and memorable, and this Drawstring Gift Bag Tutorial is designed to help you achieve exactly that without stress or complicated techniques.
What I love most about this project is how it blends creativity with usefulness. Instead of relying on store-bought gift wraps that often get thrown away after a few seconds, this handmade alternative can be reused again and again. It feels better, looks more intentional, and most importantly, it carries a personal touch that no commercial packaging can ever replicate. In fact, once you start making your own gift bags, you may find yourself never going back to traditional wrapping paper again.
Another reason this Drawstring Gift Bag Tutorial is so special is its simplicity. You do not need advanced sewing skills, expensive tools, or a large fabric stash to get started. Even if you are a complete beginner, you will be able to follow along comfortably and create something that looks polished and professional. The structure of the bag is straightforward, yet the final result feels elegant and versatile enough for all kinds of occasions. You may also enjoy creating protective handmade accessories like this DIY Fabric Laptop Sleeve Tutorial.
Why This Drawstring Gift Bag Tutorial Is Worth Making
Before diving into the sewing process, it is important to understand why this Drawstring Gift Bag Tutorial is more than just another craft project. It is actually a practical skill that you will use repeatedly in your everyday life once you learn it. Looking for more eco-friendly sewing ideas? Take a look at these Simple Things to Sew for Your Kitchen.
A. Firstly, it helps you reduce waste because instead of constantly using disposable wrapping paper or plastic bags, you are creating something reusable that can be used multiple times for different occasions, which makes it both eco-friendly and cost-effective in the long run.
B. Secondly, it adds a personal and emotional touch to your gifting experience because when someone receives a handmade gift bag, they immediately recognize the effort and care behind it, which often makes the gift feel even more special than what is inside.
C. Thirdly, it allows for complete customization because you are not limited to store-bought designs, meaning you can choose fabrics that match birthdays, weddings, holidays, or even the personality of the person you are gifting to.
D. Finally, it is a beginner-friendly sewing project that helps you build confidence while also teaching you essential sewing skills such as straight stitching, casing creation, and fabric folding techniques. For special occasions, you may also enjoy making thoughtful handmade keepsakes such as these DIY Anniversary Cards.
Materials Needed for Drawstring Gift Bag Tutorial
Before you begin, it is important to gather all your materials in one place so that your sewing process remains smooth and uninterrupted. This helps you stay focused on the creative flow instead of constantly stopping to search for tools or fabric pieces. If you have leftover fabric after this project, consider using it for a quick Fabric Bookmark Tutorial.
A. You will need a half yard of fabric, preferably cotton or any medium-weight fabric that is easy to handle, because it provides the right balance between softness and structure while still being beginner-friendly.
B. You will also need matching sewing thread that blends well with your fabric choice, since this helps create a clean and professional finish without distracting stitching lines.
C. In addition, a sewing machine is recommended, although hand sewing can also work if you prefer a slower and more mindful approach to crafting.
D. You will also need a safety pin, which plays an important role in helping you guide the ribbon or drawstring through the casing later in the process.
E. Finally, you will need a ribbon or cord measuring approximately one yard in length, which will serve as the drawstring that closes and secures your gift bag.
Step-by-Step Drawstring Gift Bag Tutorial
Step 1: Cutting the Fabric and Preparing the Base Shape
To begin this Drawstring Gift Bag Tutorial, you will first cut your fabric into a rectangular shape measuring approximately fifteen inches by twelve inches. This size is ideal for small to medium gifts such as jewelry, candles, handmade items, or even small clothing accessories. However, it is important to remember that you can easily adjust the measurements depending on the size of the gift you want to wrap, which makes this project extremely flexible. This project pairs perfectly with other beginner-friendly gift projects like this Fabric Wine Bottle Bag Tutorial.
At this stage, accuracy is helpful but not overly strict because fabric naturally adjusts during sewing. What matters most is that your edges are relatively even so that your final bag maintains a balanced and symmetrical shape.
Step 2: Preparing the Fabric Edges for a Clean Finish
After cutting your fabric, the next step in this Drawstring Gift Bag Tutorial is to prepare the edges so that your bag looks neat and does not fray over time. You do this by folding one of the longer edges of the fabric inward by approximately half an inch and pressing it firmly with an iron. Practicing clean edges here will also help when sewing an Easy Zipper Pencil Pouch.
This small step might seem simple, but it plays a very important role in giving your finished bag a professional appearance. It also ensures that the top opening of your bag remains clean and durable even after repeated use.
Step 3: Folding and Marking the Fabric for Structure
Next, you will fold your fabric with the right sides facing each other, meaning the side you want visible on the outside of the bag should be placed inward. Once folded, you will begin marking measurement points that guide where your stitching will go. If you enjoy sewing small storage items, don’t miss this DIY Drawstring Jewelry Pouch Tutorial.
At this stage of the Drawstring Gift Bag Tutorial, you will measure carefully from the top edge of the fabric and mark points that will help create the casing for your drawstring. This casing is essential because it allows the ribbon to slide through smoothly while also keeping the top of the bag securely closed when tied.
It is important to take your time during this step because proper alignment ensures that the final bag functions correctly and closes evenly on both sides.
Step 4: Sewing the Top Seam and Creating the Opening
Now you will begin sewing along the top section of your fabric, following the marks you created earlier. As you sew, you will intentionally leave a small gap in the stitching, which will later form the opening for the drawstring casing. The same careful stitching techniques are useful when making a DIY Makeup Brush Roll.
This step is crucial in the Drawstring Gift Bag Tutorial because it is what allows the bag to function as a drawstring design rather than a simple pouch. Without this opening, the ribbon would have no path to move through the fabric.
As you sew, maintain steady stitching and ensure your seam allowance remains consistent so that the structure of the bag remains even and strong.
Step 5: Creating the Drawstring Casing for Functionality
After sewing the top seam, the next step is to create the casing where the ribbon will sit. You will fold the fabric along your marked line and secure it carefully with pins to ensure everything stays aligned.
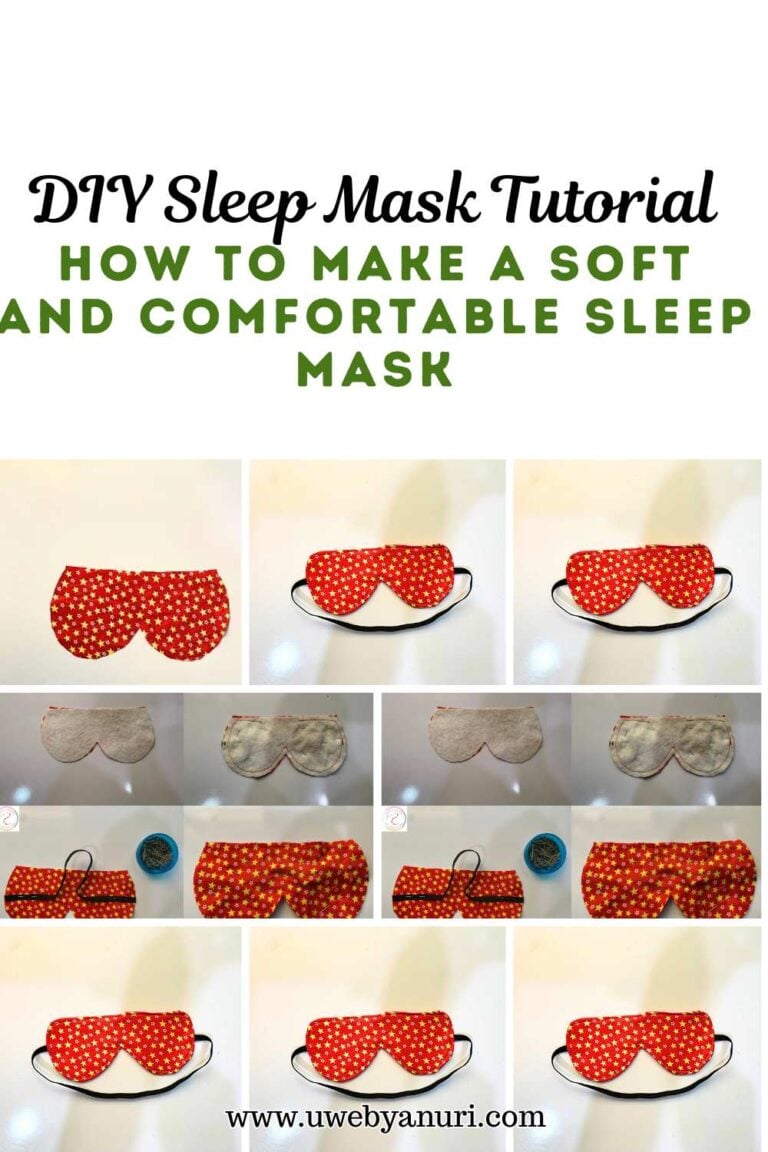
Once you’ve mastered casings, try sewing a cozy DIY Sleep Mask.
This part of the Drawstring Gift Bag Tutorial is especially important because the casing determines how smoothly your ribbon will move when opening and closing the bag. A well-constructed casing ensures that the drawstring does not get stuck or uneven during use.
Once pinned properly, you will sew along the folded edge, making sure to leave enough space inside for the ribbon to pass through comfortably.
Step 6: Sewing the Bottom of the Bag for Structure
Now you will turn your attention to the bottom of the fabric. At this stage, you will sew across the lower section to close the base of the bag, ensuring that the structure is secure and strong enough to hold items without opening. Building strong seams is an important skill you’ll also use in this DIY Diaper Changing Mat Tutorial.
This step adds stability to your project and transforms your flat fabric into a three-dimensional bag. It is one of the most satisfying parts of the Drawstring Gift Bag Tutorial because you can already start to see the final shape forming.
Step 7: Turning the Bag and Refining the Shape
Once sewing is complete, you will turn the bag right side out through the opening you previously created. As you do this, gently push out the corners so that they become smooth and defined.
This step is important because it gives your bag its final polished appearance. A well-turned bag looks professional, structured, and ready for use. Learning how to neatly turn projects right side out is also helpful for this Reversible Baby Bib Tutorial.
Step 8: Inserting the Drawstring and Completing the Bag
Now comes one of the most enjoyable parts of the Drawstring Gift Bag Tutorial, which is inserting the ribbon or cord. You will attach a safety pin to one end of the ribbon and carefully thread it through the casing until it comes out on the other side.
Once both ends are pulled through, you can tie them into a knot or bow depending on your preference. This simple finishing touch brings the entire project together and allows your bag to open and close effortlessly. If you enjoy practical handmade accessories, you may also like this DIY Fabric Sunglass Case Tutorial.
Final Thoughts on Drawstring Gift Bag Tutorial
This Drawstring Gift Bag Tutorial is more than just a sewing project; it is a creative reminder that even simple handmade items can completely transform the way we give and receive gifts. Instead of relying on disposable wrapping, you are creating something reusable, meaningful, and filled with personal intention, which naturally makes every gift feel more special. Looking for another simple project that makes a wonderful handmade gift? Try this Heart-Shaped Fabric Coaster Tutorial.
What makes this project even more rewarding is its versatility. Once you learn the basic method, you can easily adjust the size, experiment with different fabrics, and create bags for all kinds of occasions without starting from scratch each time. Over time, you may even find yourself building a collection of handmade gift bags for birthdays, holidays, and everyday surprises.
Most importantly, this project encourages creativity in a gentle and enjoyable way. It does not require perfection or advanced skills, only patience and willingness to try something new. And as you continue sewing, you will notice how each finished bag becomes a reflection of your personal style and effort.
So take your time, enjoy the process, and allow yourself to create something that is not only useful but also genuinely meaningful.