

How to read a Sewing Pattern
Let’s be honest, there is a very specific kind of fear that comes with sewing patterns (especially when learning how to read a sewing pattern). Not the loud, dramatic kind of fear; this is the quiet one that shows up when you unfold the paper, stare at all the lines, arrows, and symbols, and think, “I thought sewing was supposed to be relaxing.”
Maybe you’ve been there. You bought fabric you loved and imagined the finished outfit. You were excited, but then you opened the pattern and suddenly felt lost. Nothing looked familiar, nothing made sense, and sewing stopped feeling fun.
If that sounds like you, you’re not alone. Many beginners experience this feeling when learning how to read a sewing pattern.
The truth is, sewing patterns are often blamed for being complicated when the real issue is that they’re rarely explained in a beginner-friendly way. Most explanations try to teach everything at once. However, reading a sewing pattern doesn’t require you to know everything about sewing. You only need to understand a few key parts and how they relate to each other. For tips on starting small, you might enjoy our 21 easy sewing projects for complete beginners.
In this post, we’ll focus on how to read a sewing pattern; not fabric science, not advanced fitting, not sewing techniques. We’ll explain just the pattern itself: what you’re looking at, what it’s trying to tell you, and how to follow it without feeling overwhelmed. If you’re unsure about some of the terminology, check out our complete sewing glossary for beginners to get familiar with the words patterns use
Understanding Sewing Pattern Symbols
Sewing patterns use symbols as a visual language to guide you through cutting, marking, and sewing your fabric correctly. Once you understand what each symbol means, reading a pattern becomes less intimidating and sewing feels more enjoyable and accurate.
Grain Line
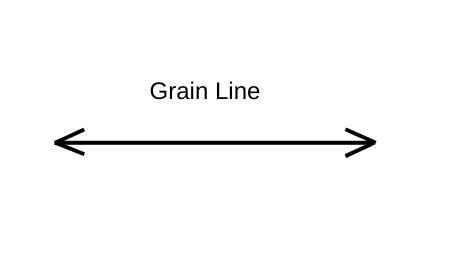
Every pattern piece has a long arrow called the grainline. This arrow shows how the piece should be placed on the fabric. The grainline helps the garment hang correctly when worn. If ignored, the finished piece may twist or stretch unexpectedly. Understanding the grainline as part of reading the pattern; not just decoration, reveals the information built into the paper itself.
Place on Fold
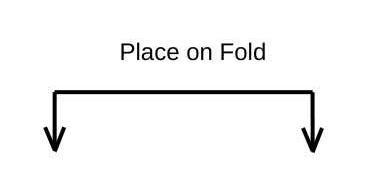
This means the pattern edge should be placed on the folded edge of the fabric. When cut, it creates one full, symmetrical piece.
Notches
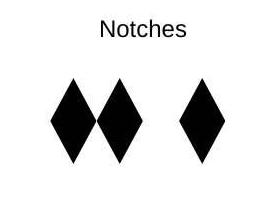
Notches help you match pattern pieces correctly when sewing. They are especially useful around curves, seams, and sleeves.
Stitching Line
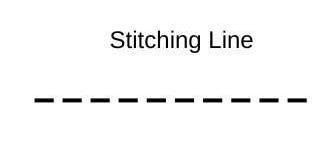
This line shows exactly where you should sew. It is different from the cutting line and should not be cut.
Cut Line
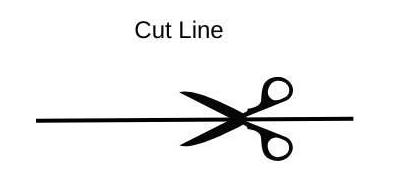
Most patterns include several sizes printed on the same sheet, each represented by a different line style. When reading a pattern, follow only the cutting line for your chosen size. Cutting the wrong line doesn’t mean failure. It shows why careful reading matters.
Lengthen / Shorten Line
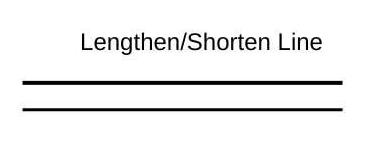
This line allows you to adjust the length of the pattern. You can make the garment longer or shorter without changing its shape.
Button
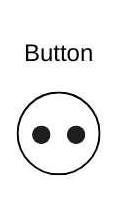
This symbol shows the type and size of button to use. It helps you choose the right button for the pattern.
Button Placement
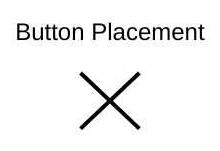
This mark shows the exact spot where the button should be sewn. Correct placement ensures proper closure and fit.
Button Hole
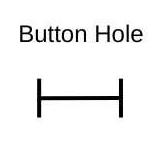
This symbol shows where the buttonhole should be made. It also indicates the correct length of the buttonhole.
Pleats
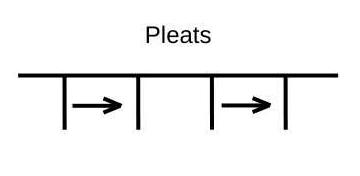
Pleat symbols show where the fabric should be folded. The arrows indicate the direction of the fold.
Dart Line
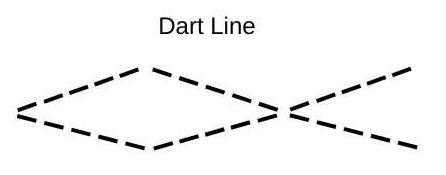
Dart lines show where fabric should be folded and stitched to shape the garment. They help create a better fit around curves.
Markings to Transfer

Small triangles, dots, or squares on pattern pieces help you align and match pieces accurately during sewing. When two pieces look similar, these symbols guide you. Reading and transferring them correctly ensures the pattern works as intended. These symbols must be copied onto the fabric before sewing. They guide placement of details like darts, pockets, or pleats.
Multi-Size Cutting Line
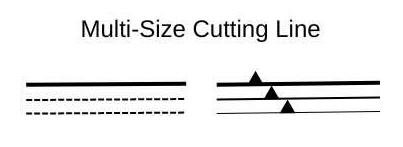
This shows different cutting lines for different sizes. You should follow the line that matches your chosen size.
Seam allowance is the space between the edge of the fabric and the stitching line. Some patterns include this allowance, while others expect you to add it. The instruction sheet will clarify which applies. Understanding this helps you avoid fit issues later.
Zipper Placement
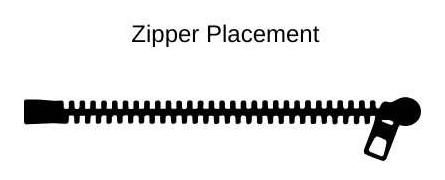
This symbol shows where the zipper should be sewn. It helps ensure the zipper is placed neatly and correctly.
Recommended for you: A simple guide to symbols and markings
How to read a Sewing Pattern
At its core, a sewing pattern does just two jobs: it shows you what shapes to cut from your fabric and tells you how to put those shapes together. Everything else on the pattern, such as numbers, symbols, charts, and instructions, supports these two goals.
At first glance, sewing pattern pieces may look strange and disconnected. That doesn’t mean you’re reading them wrong. Pattern pieces are not meant to look like clothing on their own. They only make sense once cut, sewn, and joined together. Learning how to read a sewing pattern means seeing these shapes as instructions, not finished objects.
Whenever a pattern starts to feel confusing, remind yourself: you are not being tested, and you are not expected to understand everything immediately. The pattern is simply guiding you from fabric to finished garment. For guidance on accurate stitching, you might find our How to sew a neat straight line(beginner friendly guide).
Understanding Pattern Sizes
Sizing is one of the first places beginners feel discouraged, but it’s also one of the most important parts of reading a sewing pattern correctly. Pattern sizes are based on body measurements, not store sizes. This means the number on the pattern may differ from what you usually wear. It doesn’t indicate anything is wrong. It just indicates that the systems differ.
To read this part correctly:
- Measure your bust, waist, and hips
- Compare your measurements to the size chart of the pattern
- Choose the size closest to your measurements
Also, learning how to take accurate body measurements ensures you pick the correct pattern size.
A Simple Example
If you usually buy a medium or size 10 dress, your measurements might match a size 14 on the pattern chart. This doesn’t mean the pattern runs small, and it doesn’t mean your body changed. It simply means sewing patterns and ready-made clothes use different sizing systems. Understanding this makes sizing less emotional and more practical.
Reading the Sewing Pattern without overwhelm
Each pattern piece contains information meant to guide you. Once you know what to look for, the pieces stop feeling random and start feeling intentional.
Each piece has a number and a name, such as “Front Bodice” or “Sleeve.” The number connects the piece directly to the instruction sheet. For example, if the instructions say, “Sew piece 1 to piece 2,” you can locate those exact shapes on the pattern instead of guessing. This connection between the paper pieces and the instructions is key to reading a sewing pattern.
The instruction sheet connects everything together, showing you what to do with the pieces you’ve learned to identify. Instead of understanding every step at once, approach instructions as part of the reading process: read through once, notice how pieces are introduced and named, then go back and start from the first step.
A realistic way to think about Instructions
Think of the instruction sheet like a recipe. You don’t cook the entire meal while reading it the first time. You read, then act; one step at a time. If step one tells you to join the front and back pieces, that’s all you focus on. Sleeves, hems, and finishing steps come later. Reading a sewing pattern means trusting that the instructions guide you in order.
How all parts of the Pattern work together
Once you understand the pattern pieces, and the instruction sheet, the pattern stops feeling like scattered information. You begin to see the structure: the plan is explained, the pattern pieces show the shapes, and the instructions explain the order. Reading a sewing pattern is about moving between the parts calmly and confidently.
A realistic expectation for Beginners
You are not expected to understand everything the first time. Reading sewing patterns is a skill developed through repetition. Each pattern teaches you something new, even when you make mistakes. Confusion doesn’t mean failure; it means you’re learning to interpret a new kind of information.
Final Thoughts
A sewing pattern is not there to overwhelm you. It guides you from fabric to finished garment. When you focus on reading the pattern and understanding what each part tells you and how it fits into the whole, the process becomes manageable and satisfying. Take your time, read slowly, and focus on one section at a time. With practice, that folded tissue paper will stop feeling intimidating and start feeling familiar. Beginners can also reinforce their skills with our 10 beginner hand stitch techniques.


One Comment