

How to take accurate body measurement
Getting the right fit is one of the most important parts of sewing your own clothes. Since no two bodies are exactly the same, relying on standard sizes often leads to garments that feel “almost right” but never quite perfect. Learning how to take accurate body measurements allows you to sew clothes that truly fit you, not a generic size chart.
Related reads: 35 beginners sewing projects that actually sells
Accurate measurements are the foundation of successful sewing, whether you’re following a commercial pattern, drafting your own, or making adjustments for a better fit. When measurements are taken incorrectly, even the most beautiful fabric and careful stitching can result in clothes that feel uncomfortable or unflattering. Taking the time to measure properly saves fabric, reduces frustration, and gives you better results from the very start.
In this post, we’ll guide you step by step through how to take accurate body measurements the right way. You’ll learn which measurements matter most, how to measure yourself correctly, and tips to ensure consistency and accuracy. By the end, you’ll feel confident measuring your body and creating garments that fit comfortably and make you look and feel fantastic.
Getting Ready to take accurate body measurement.
Before taking accurate body measurements, it’s important to prepare properly to ensure your results are as precise as possible. Wear minimal clothing or close-fitting garments, such as fitted leggings and a fitted top, so the tape measure can sit directly against your body. Avoid measuring over bulky clothing like jeans, sweaters, or layered outfits, as these can add extra bulk and lead to incorrect measurements. Stand naturally, without sucking in your stomach or tightening your muscles, and make sure you are relaxed and comfortable.
Gather the right tools before you begin to make the process smooth and accurate. You’ll need a soft, flexible tape measure, along with a pen and paper (or your phone) to record each measurement as you go. If possible, ask someone to help you, as this can make measuring areas like the back, shoulders, or waist easier and more accurate. If you’re measuring yourself, a full-length mirror can be very helpful to ensure the tape measure stays level and correctly positioned.
More related topics: 35 Sewing projects that actually sells
Essential Tools for Accurate Body Measurements.
Taking accurate body measurements requires the right tools. Here are the must-haves:
1. Flexible Tape Measure
– A flexible, non-stretchy tape measure is perfect for taking body measurements.
– Look for one with measurements in inches and centimeters.
– Tip: Use a tape measure with a lock to keep it in place.
2. Mirror
– A full-length mirror helps you see what you’re doing and ensures the tape measure is straight.
– Stand in front of a mirror to check your posture and tape measure placement.
3. Ruler or Straight Edge
– A ruler or straight edge helps you take accurate measurements for straight lines (e.g., shoulder to shoulder).
– Use it to ensure the tape measure is level and parallel to the floor.
4. Measurement Recorder
– Use a notebook or app to record your measurements.
– Write down each measurement as you take it to avoid mistakes.
5. Helper (Optional but Helpful)
– Having someone to help with hard-to-reach measurements (e.g., back length) is super helpful.
– They can also help you keep the tape measure in place.
Using Your Tools Effectively.
– Stand up straight and relax when taking measurements.
– Keep the tape measure level and parallel to the floor for circumference measurements.
– Take measurements at the right spot (e.g., bust, waist, hip).
– Don’t pull the tape measure too tight, it should be snug but not constricting.
The Different Body Parts To Measure.
You don’t need to take all the measurements listed below. Depending on the style of clothing you are making, you will need different measurements. Check your pattern or instructions to see what measurements you specifically need.
Most sewing patterns list 3 basic measurements to help you choose the size to sew: bust, waist and hip. The other measurements will help you with fitting.
Recommended for you: 25 Easy sewing projects one can do without pattern
Taking Measurements
Stand upright, relax, and breathe naturally. Keep your arms loose by your sides, shoulders down, and back straight. Ensure the tape measure is straight and parallel to the floor for circumference measurements.
Key Measurements
1. Waist: Measure around the narrowest part of your torso, usually above the belly button.
2. Bust: Measure around the fullest part of your bust, keeping the tape level.
3. Full Hip: Measure around the widest part of your hips, usually around the bottom.
Other Useful Measurements.
– Shoulder + Shoulder Seam
– Front Bodice (waist length)
– Back Bodice (center back length)
– Arm Length
– Upper Hip
– Upper Bust
– Rise + Crotch Depth
– Neck
– Thigh.
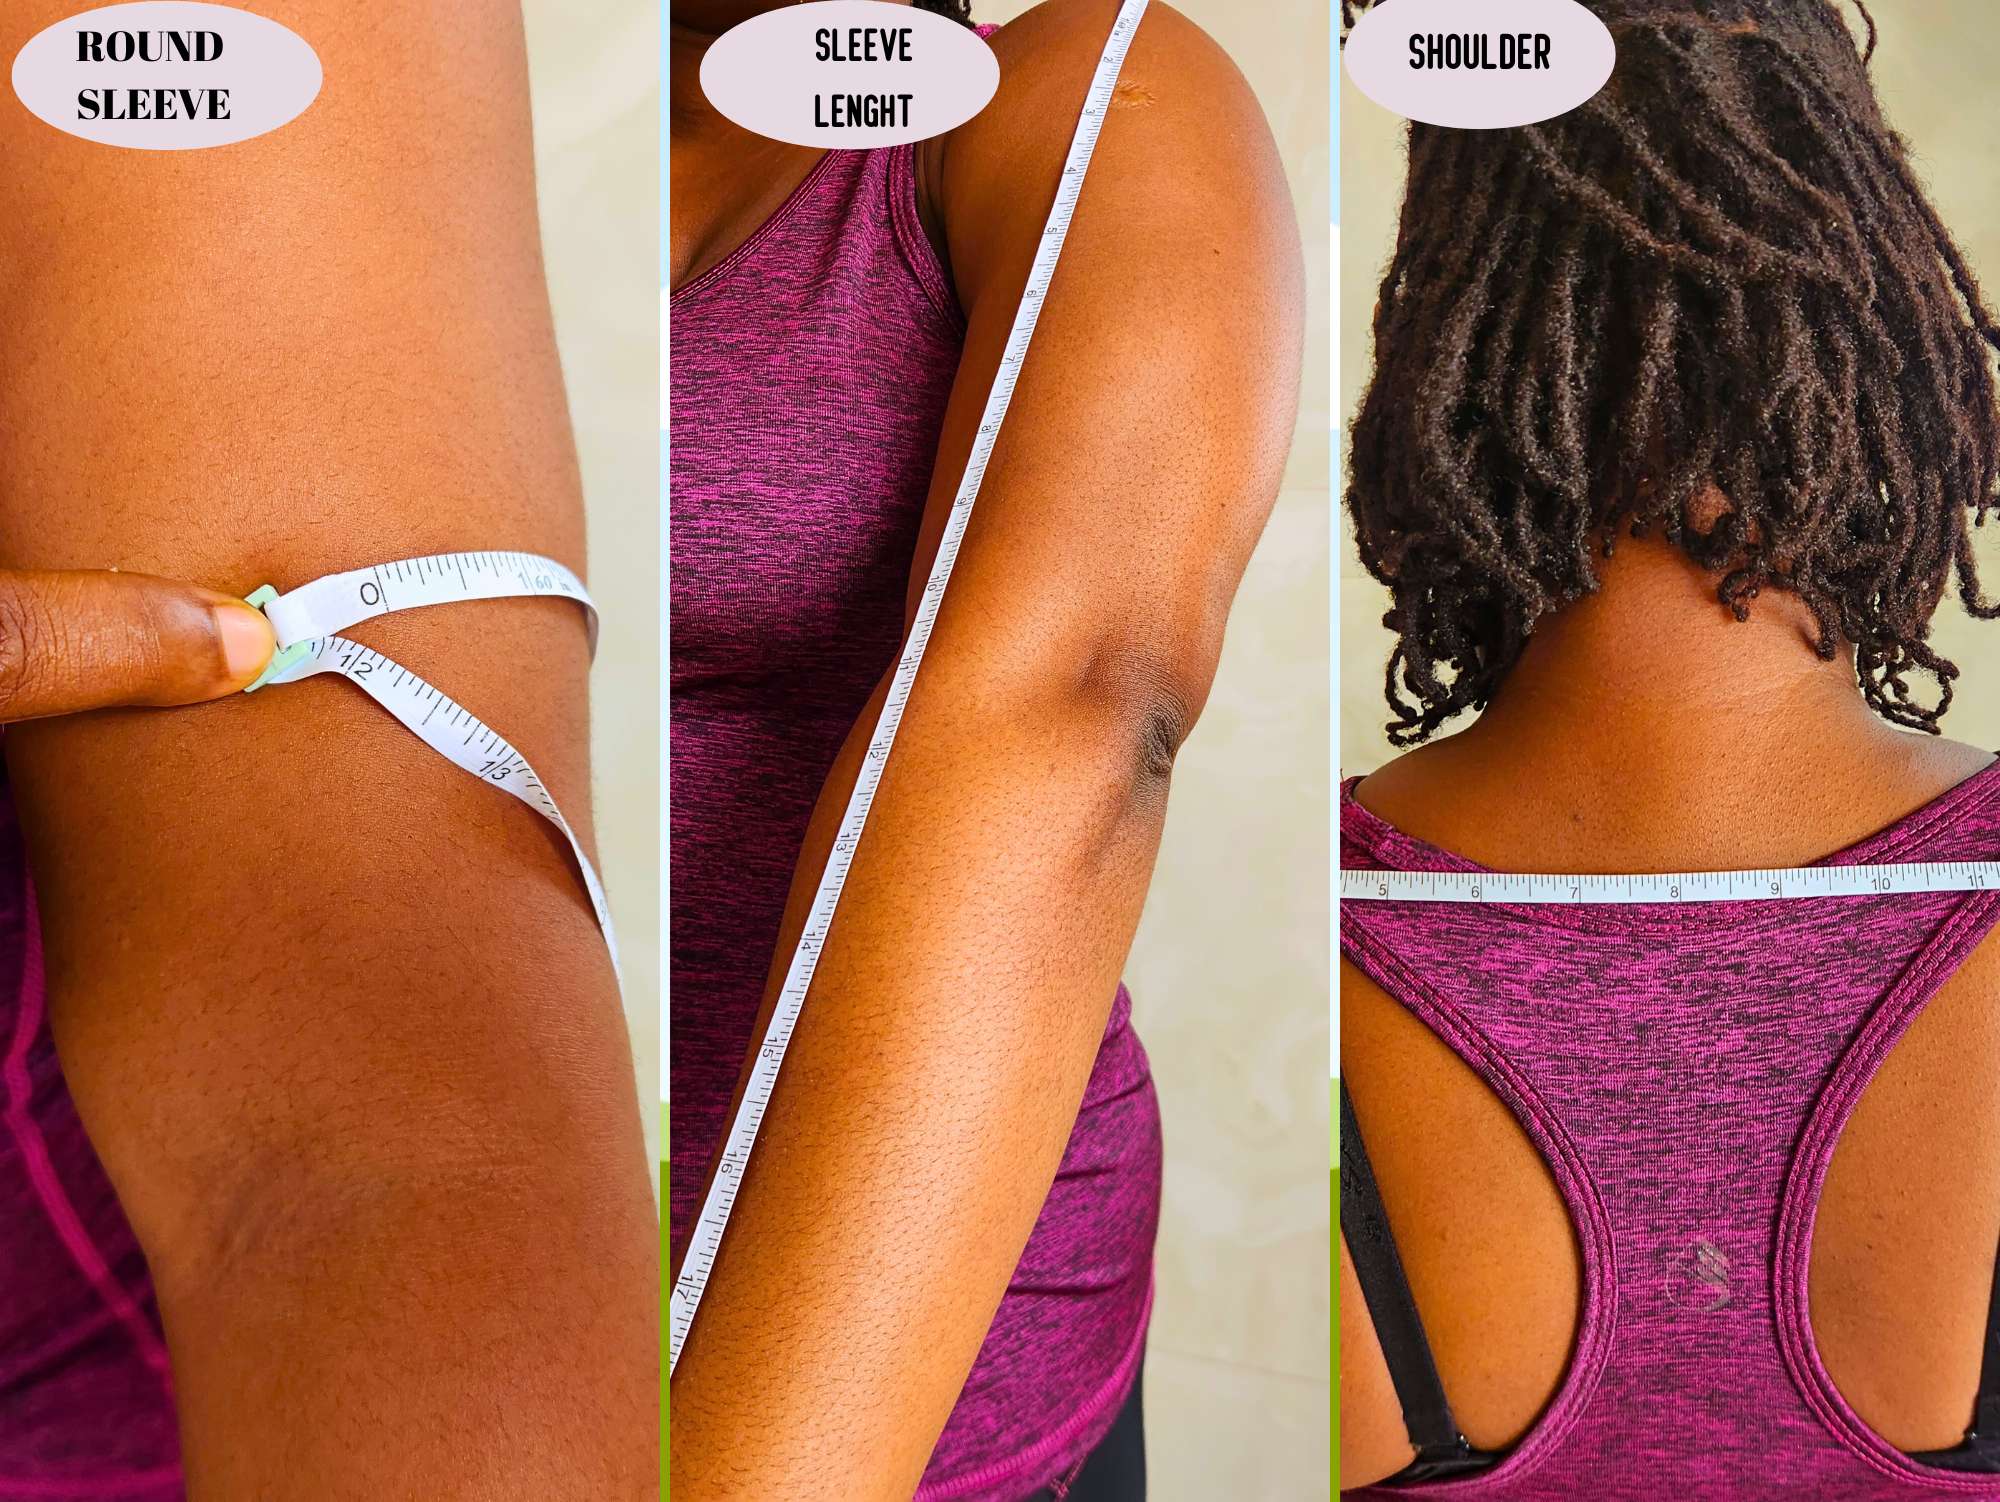
1. Shoulder + Shoulder Seam: Measure across your back from one shoulder edge to the other. Place the tape measure on the point where your shoulder meets your neck and go straight across to the other shoulder.
2. Front Bodice (waist length): Measure from the shoulder (next to the base of the neck) down to your waist, passing over the fullest part of your bust.
3. Back Bodice (center back length): Measure from the base of your neck (center) down to your waistline.
4. Arm Length: Measure from the shoulder edge (top of the arm) down to the wrist bone, with your arm slightly bent.
5. Upper Hip: Measure around the top part of your hips, about 2-3 inches below your waist.
6. Upper Bust: Measure around your bust, under your armpits, and above the fullest part of your bust.
7. Rise + Crotch Depth: Measure from your waist, between your legs, to the back waist. This gives you the full rise. You can also take front and back rise measurements separately.
8. Neck: Measure around your neck, just above your collarbone.
9. Thigh: Measure around the fullest part of your thigh, usually around the top part.
The basic measurements for Trousers
Full hip
Waist
Trouser length
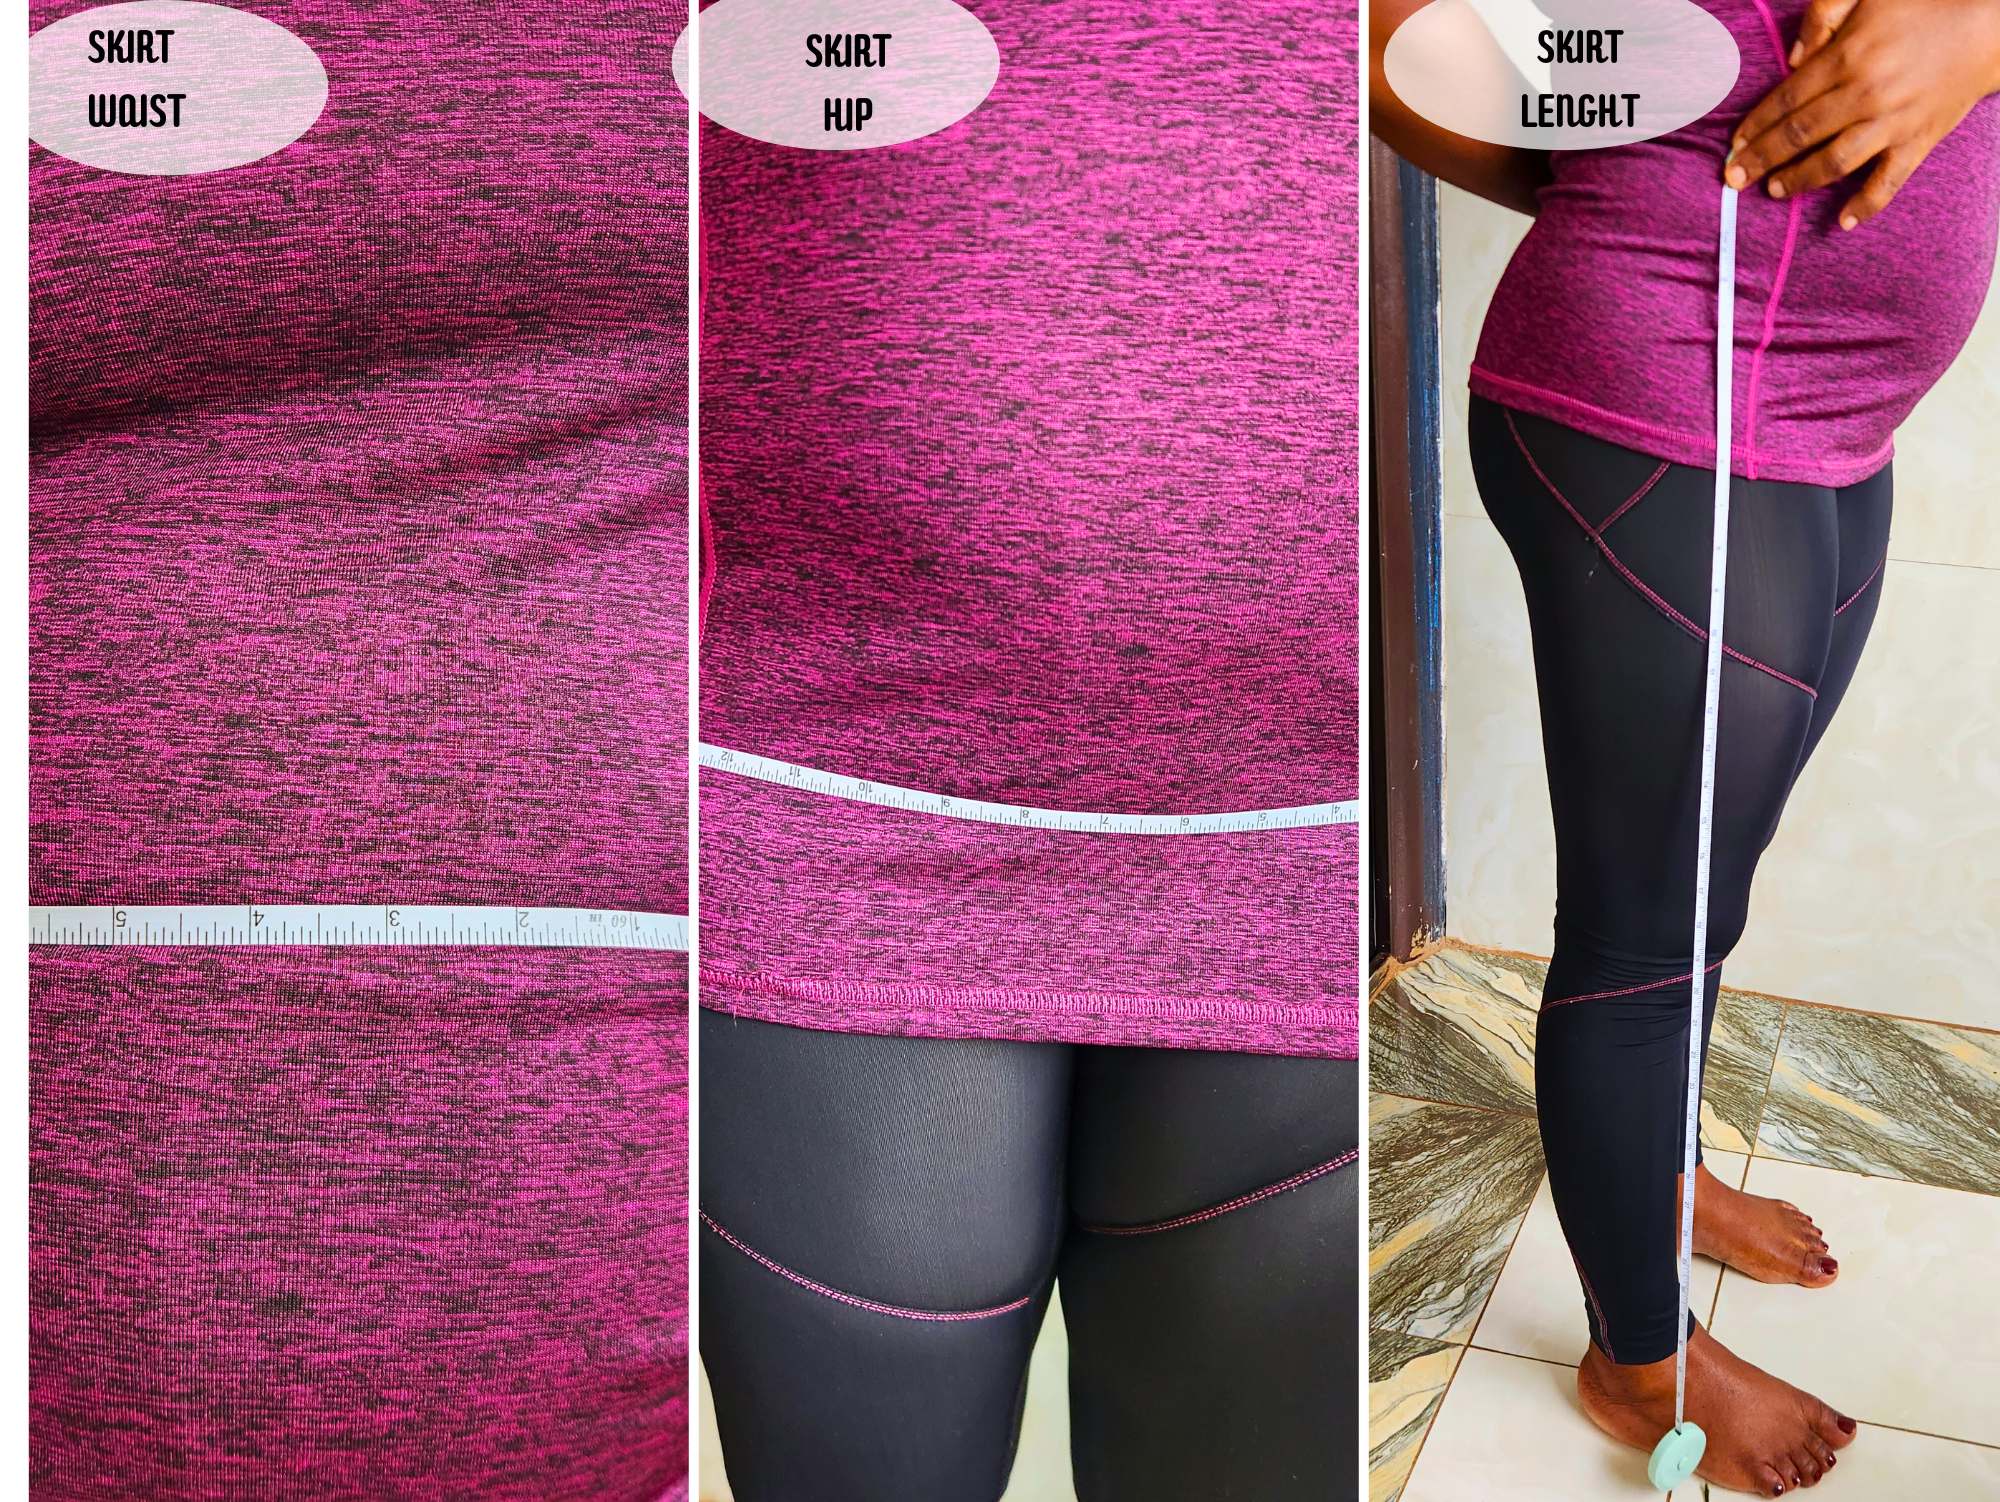
Skirts
Waist
Hip
Length of skirt

Blouse and shirts:
Shoulder
Half lenght
Bust or chest
Arm length

Tips for taking accurate body measurements.
Here are some extra tips to help you take accurate measurements:
– Wear the right clothes: Wear tight-fitting clothes or undergarments (like a bra or tank top and leggings). This ensures your measurements are accurate.
– Stand up straight: Good posture helps you get accurate measurements. Stand tall, look straight ahead, and relax your shoulders.
– Use the right tape measure: A flexible, non-stretchy tape measure works best.
– Don’t pull too tight: Keep the tape measure snug but not tight. You should be able to fit a finger under it.
– Take measurements at the right spot
– Double-check your measurements: Take measurements twice to ensure accuracy.
you might also love: 35 simple sewing projects for beginners with fat quarters
Common mistakes to avoid in body measurements.
Here are some common mistakes to watch out for:
– Tape measure too tight or loose: Make sure it’s snug but not constricting.
– Measuring over bulky clothes: Wear tight-fitting clothes or take measurements on bare skin.
– Wrong posture: Stand up straight, don’t slouch!
– Measuring at the wrong spot: Double-check the measurement points (e.g., bust, waist, hip).
– Not measuring in a straight line: Keep the tape measure level and parallel to the floor.
– Rounding numbers: Take precise measurements (e.g., 34.5 inches, not just 35).
– Not considering garment type: Take measurements with the bra, shoes, etc., you’ll wear with the garment.
– Measuring yourself: Ask a friend for help with hard-to-reach areas.


One Comment